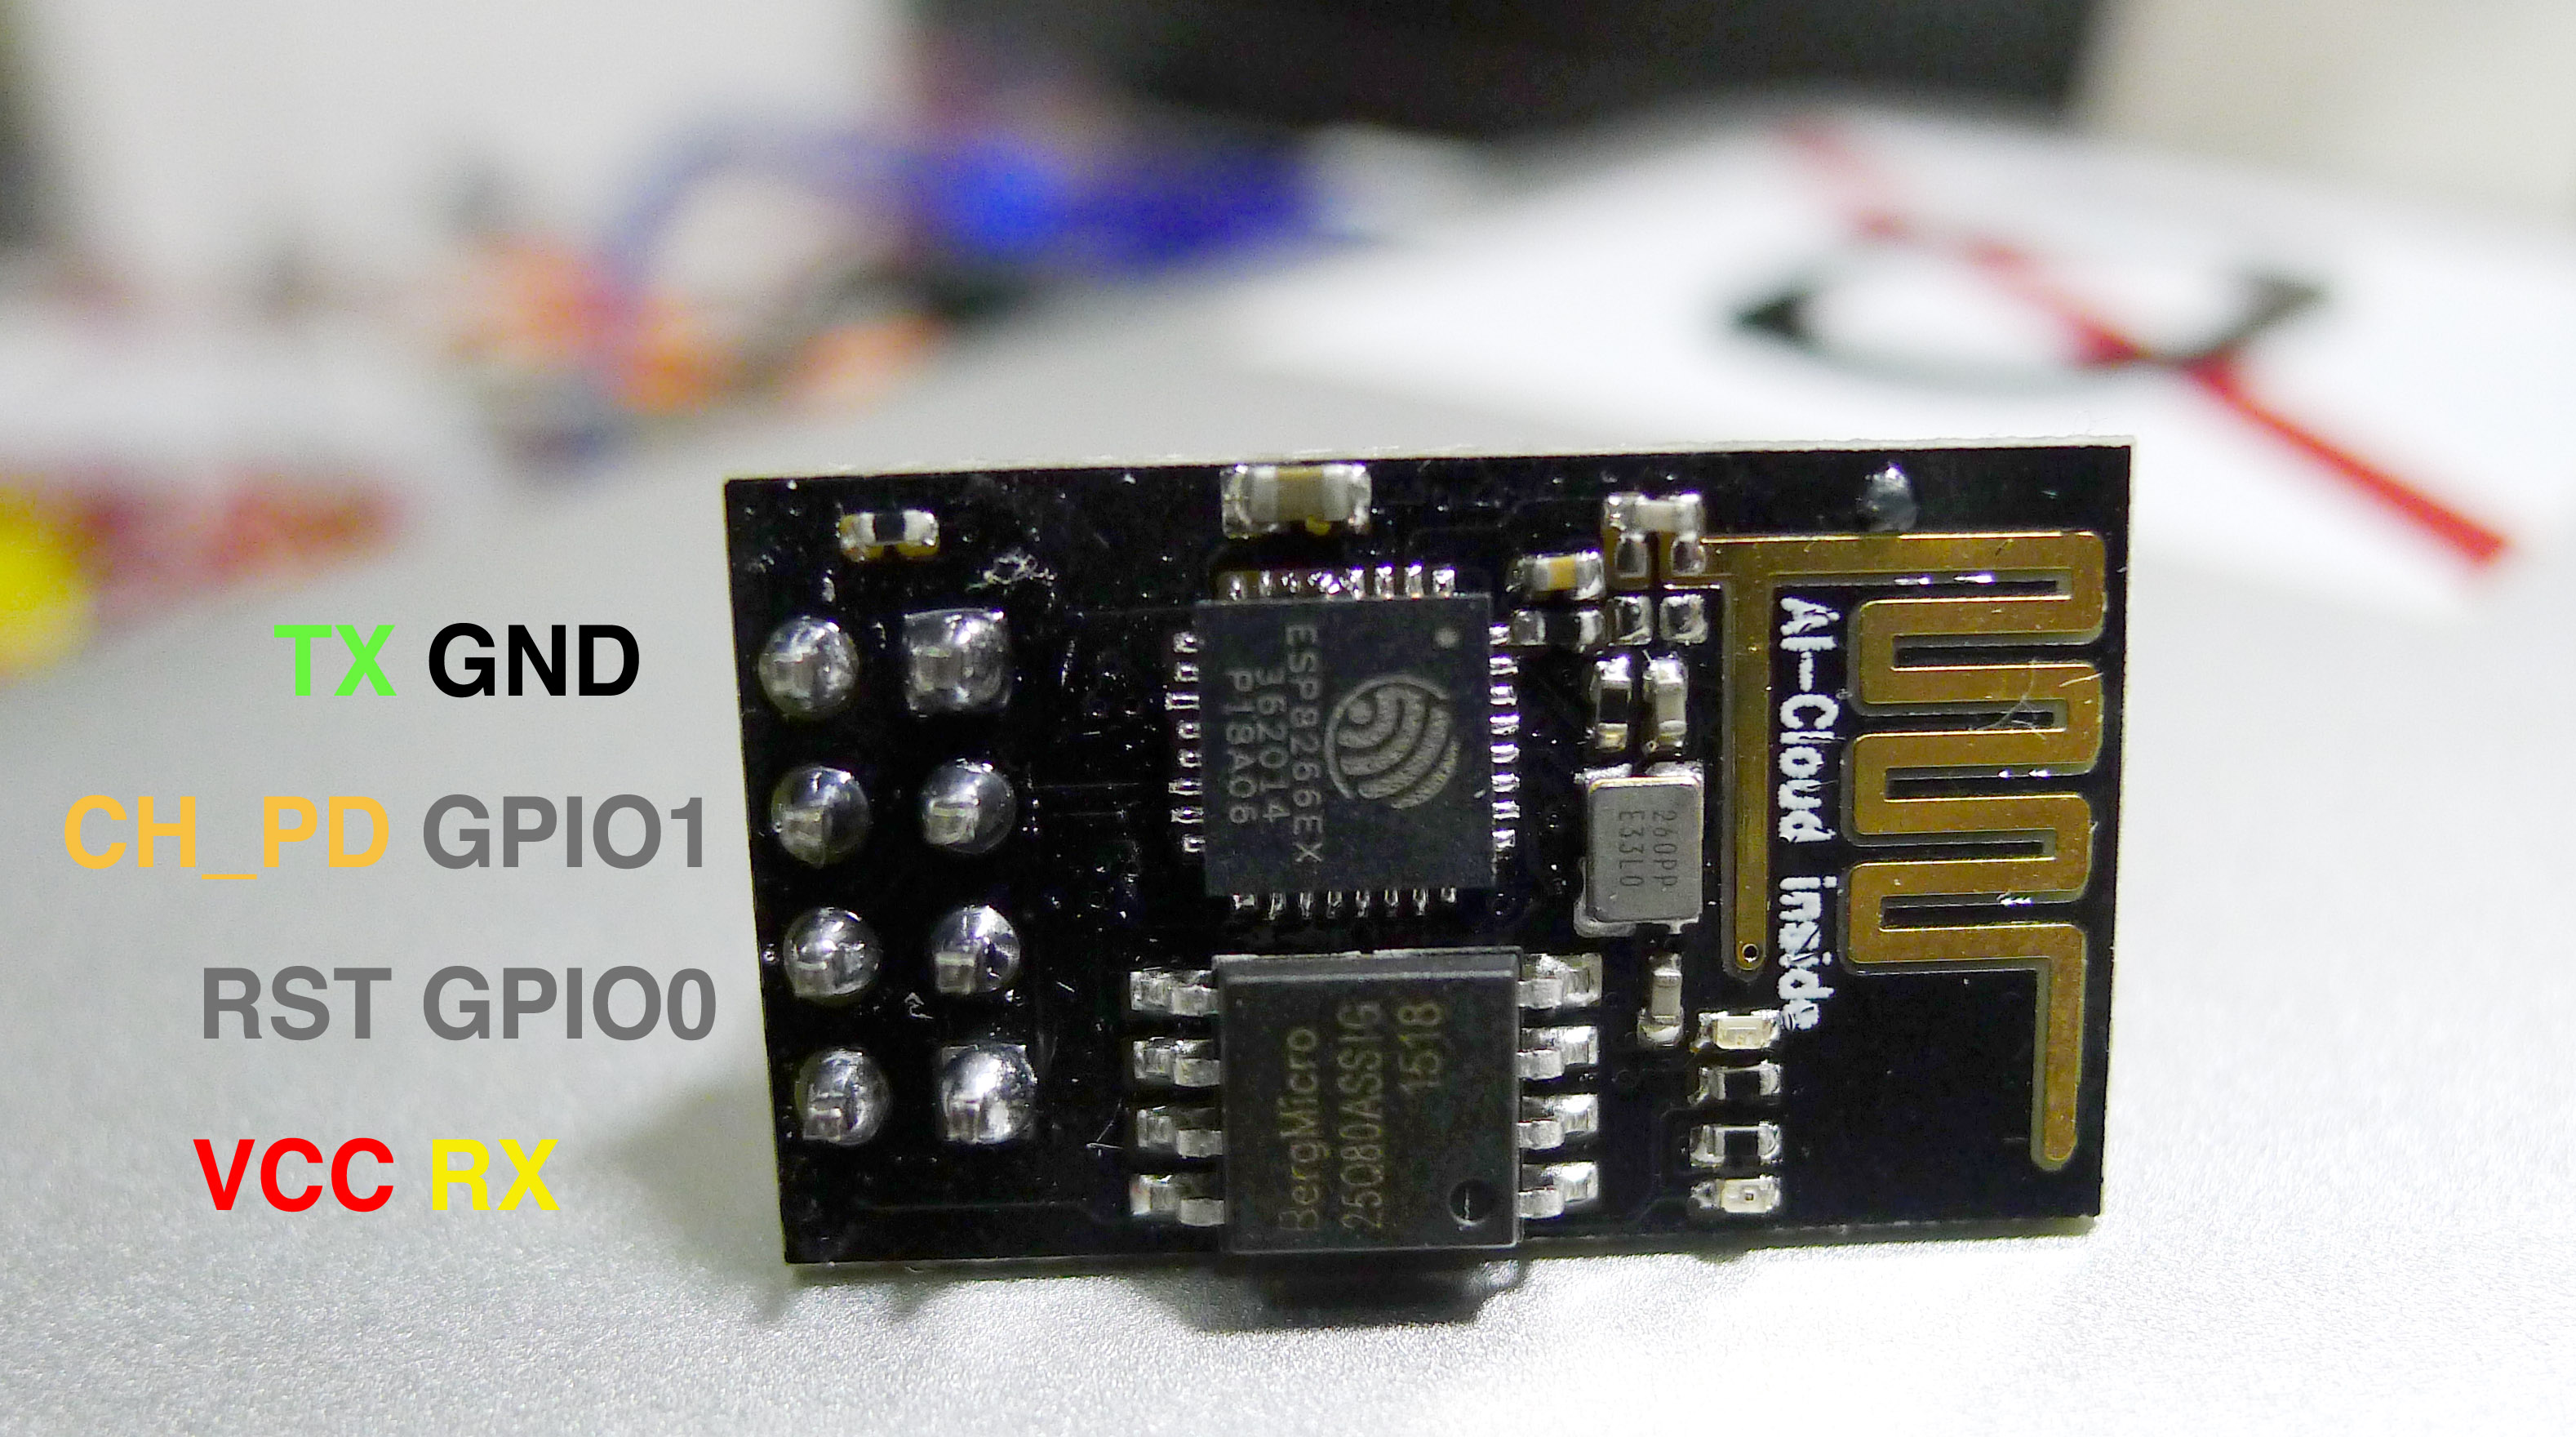
ESP8266 是一個約六十元就買得到的超便宜的 wifi 晶片,因為他的平易近人,就像巷口的早餐店,甚至在網路上形成一個社群,隨隨便便就能找到一堆文章在介紹,只是看了一些文章以後,自己實作還是遇到一些問題,所以就寫篇文章紀錄一下吧。
也或許是我的環境是在 Mac OS X..
ESP8266 是一個約六十元就買得到的超便宜的 wifi 晶片,因為他的平易近人,就像巷口的早餐店,甚至在網路上形成一個社群,隨隨便便就能找到一堆文章在介紹,只是看了一些文章以後,自己實作還是遇到一些問題,所以就寫篇文章紀錄一下吧。
也或許是我的環境是在 Mac OS X..
專案位置:https://github.com/mlwmlw/flyingCat
預計紀錄製作過程,先作為暫存區,先試過 multiwii,感測器畫面讀得到,只是沒有遙控以後就不知道要幹麼了,開啟土炮之路..。
電機:arduino uno
機架:FY450
電調(ESCs):新西達四軸 30A
馬達(Motors):高品質黑金剛 2212/15T 930KV 無刷馬達 * 4
感測器:GY80
通訊:藍牙 A09 HC-05
電池:拔拔的三顆 3.7v 鋰電池串聯
Continue reading…

OpenWRT 是一個 Open Source 的 Linux AP 專案,可以在市面上尋找目前已經支援的裝置,買回來自己更新韌體,跟刷 Andriod 手機有類似的快感…,他還附有幾個網頁介面能裝,例如 Luci 非常具有 Linux hacker 味道不親和的介面…。紀錄一下建立的環境跟額外編譯 ovs 模組的指令。
Continue reading…
最近在補充驅動程式相關的知識,實際上的練習其實是有點麻煩的,因為你真的要有實際的硬體比較方便你練習實作,而我又是用手驅動腦學習的實踐者…,所以就思考到要怎麼作這件事。
現在其實 CPU 與硬體週邊都有 qemu + kvm 這套很不錯的模擬器可以用來練習安裝與開發核心了,但是裡面都是一堆已經改好的驅動,還是不知道該怎麼下手。
以我目前的理解裡面最簡單又實際的驅動應該是 GPIO 的開發~,所以想到如果可以有一個工具可以在 qemu 裡面模擬 GPIO 裝置,然後可以用一個 app 來觸發這個裝置的中斷或值的改變,這樣應該不失為一個很完整的練習環境吧…!
而且如果能自己設計調整外部裝置的一些訊號狀態,應該更能增進開發者軟硬整合之間的知識~
這幾天裝了Android 2.2 的模擬器,想要裝個 market 來玩玩,結果挫敗連連…
ADB:可以連接模擬器的工具在android sdk tools 裡面,可以進 shell 還有一些額外的指令工具。
紀錄一下步驟…
模擬器與adb指令 http://xxlinxx.wordpress.com/
今日延燒至Linux Mint 中成功了…,因為被 Ubuntu 10.10 的 Eclipse 氣死了,原本主要的問題好像都是 push 完以後重開就都沒了,只是這次完全照著作就沒事了…嘆…
參考這篇回應的 http://anythingsimple.blogspot.com/2010/09/how-to-use-android-market-on-android.html
Linux Users
1. Create your avd using either terminal or gui. #建立一個 2.2 的 avd
A. Terminal – cd to the location of your SDK tools folder and run
./android create avd -n android-2.2 -t 7
B. Gui – run ./android from you SDK tools folder and make a new 2.2 virtual device
named android-2.2
*Note – Replace the 7 in the terminal with whatever 2.2 is for you. You can find out by running
./android list target
2. Copy the system.img from your sdk using the terminal or manually #複製 system.img 到你的 avd 資料夾下 ,不知道目的是啥,因為 system.img 好像設完後沒改變大小
Terminal – cp /home/USER/location of sdk/platforms/android-8/images/system.img ~/.android/avd/android-2.2.avd
3. Start the emulator using either the terminal or gui #開啟模擬器用指令的方式 才能設 partition-size 等下要 remount 用的
A. For terminal (Make sure your in your SDK tools folder) – ./emulator -avd android-2.2 -partition-size 96
4. After the emulator has fully started we need to pull build.prop (Open a terminal if needed and go to the tools folder) #把 build.prop 拉出來
A. Terminal – ./adb pull /system/build.prop
*Note – Open a new terminal or a new tab and cd back to the tools folder of the sdk.
5. Comment out ro.config.nochecking=yes from the file by putting a # in front of the line. # 把不允許登入 google 拿掉
A. Terminal – gedit build.prop
B. Save changes and exit
6. Push back the update build.prop # remount 後推回去
Terminal – ./adb remount
./adb push build.prop /system/build.prop
7. Get the custom rom linked above. Extract it to your desktop and rename the folder
to r21
8. Run the following commands in the terminal # 把 goole service 跟 market apk push 上去
./adb push ~/Desktop/r21/system/app/GoogleServicesFramework.apk /system/app
./adb push ~/Desktop/r21/system/app/Vending.apk /system/app
9. Remove the SdkSetup file #移除SdkSetup ? 有啥用
./adb shell rm /system/app/SdkSetup.apk
10. Finally stop the emulator and run these commands in terminal #砍掉幾個記憶檔
cd ~/.android/avd/android-2.2.avd
rm -R userdata-qemu.img userdata.img cache.img
11. Start up the emulator and you should now have the market! #重開吧 !去抓遊戲來玩…